全局异常处理
通过创建一个基础异常类,该类继承运行时异常,
/**
 * 业务异常
 */
public class BaseException extends RuntimeException {

    public BaseException() {
    }

    public BaseException(String msg) {
        super(msg);
    }

}
而项目中所有业务异常都继承该基础异常类(BaseException)
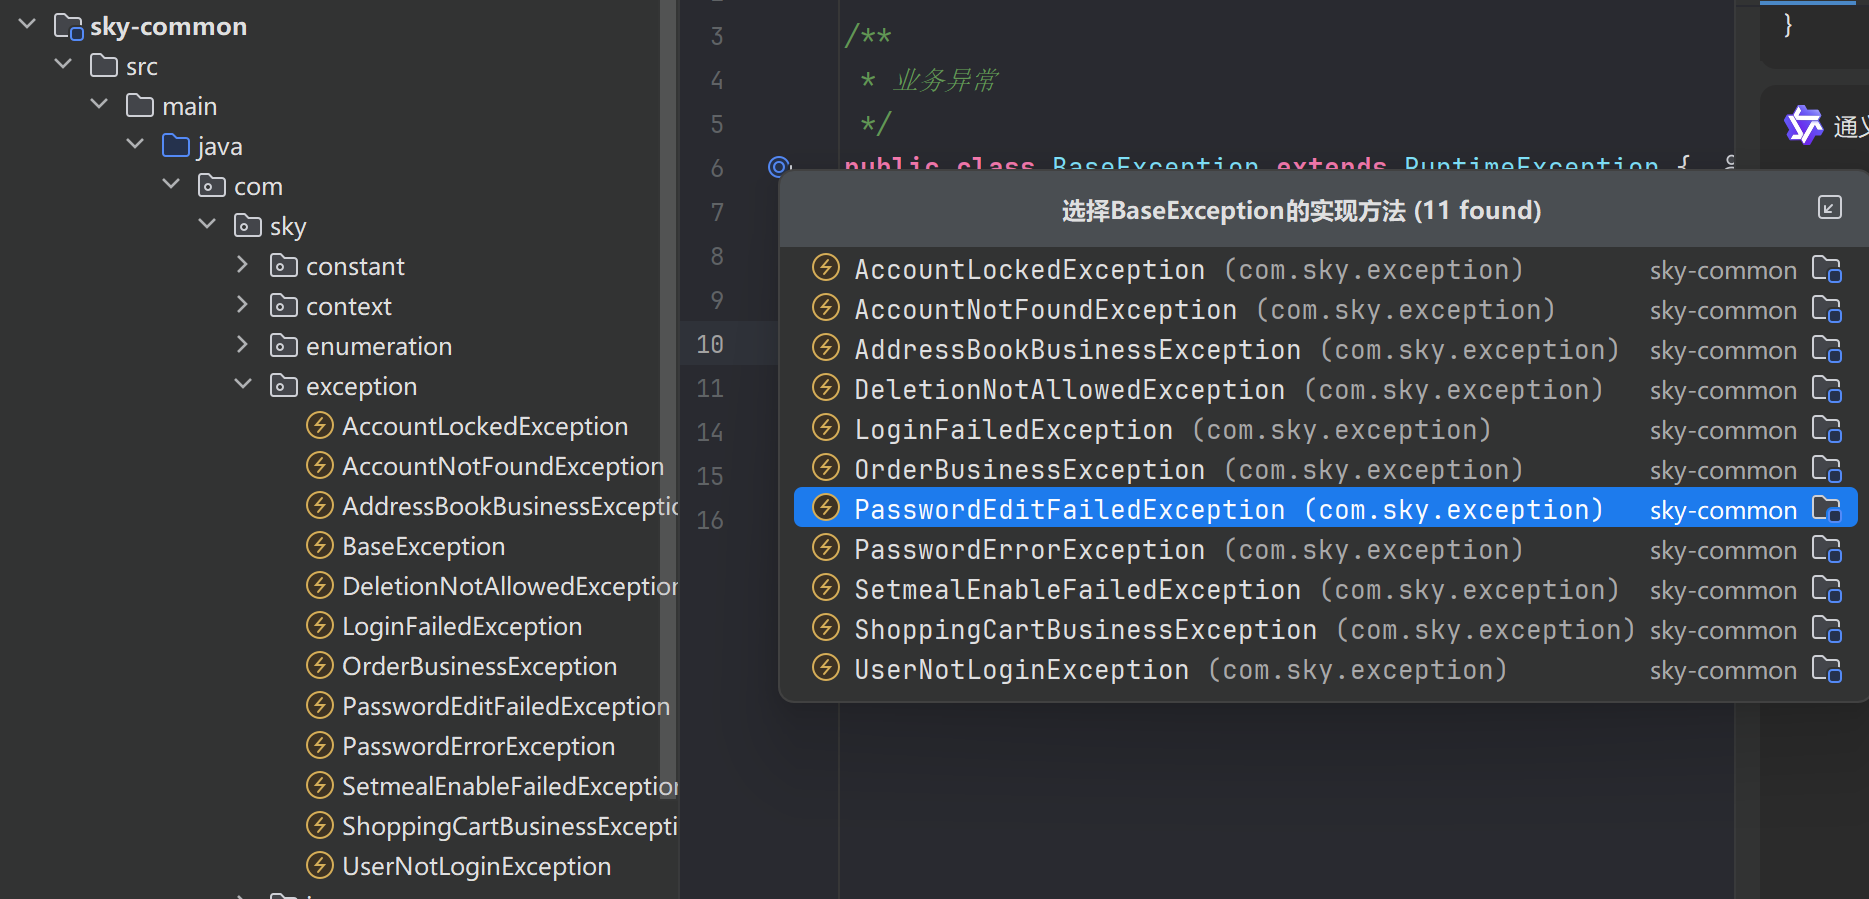
一个全局异常处理器,处理BaseException,业务流程中抛出的异常,经过该全局异常处理器的捕捉,最后通过一个统一的结果对象返回给前端
/**
 * 全局异常处理器,处理项目中抛出的业务异常
 */
@RestControllerAdvice
@Slf4j
public class GlobalExceptionHandler {

    /**
     * 捕获业务异常
     * @param ex
     * @return
     */
    @ExceptionHandler
    public Result exceptionHandler(BaseException ex){
        log.error("异常信息:{}", ex.getMessage());
        return Result.error(ex.getMessage());
    }

}
统一的返回结果类Result,定义了重载的success静态方法(分别对应有无返回数据),和一个静态error方法。
该Result类运用了静态工厂方法模式(由Joshua Bloch在《Effective Java》中提出和推广),即不使用new,而是调用静态方法便返回对象。
package com.sky.result;

import lombok.Data;

import java.io.Serializable;

/**
 * 后端统一返回结果
 * @param <T>
 */
@Data
public class Result<T> implements Serializable {

    private Integer code; //编码:1成功,0和其它数字为失败
    private String msg; //错误信息
    private T data; //数据

    public static <T> Result<T> success() {
        Result<T> result = new Result<T>();
        result.code = 1;
        return result;
    }

    public static <T> Result<T> success(T object) {
        Result<T> result = new Result<T>();
        result.data = object;
        result.code = 1;
        return result;
    }

    public static <T> Result<T> error(String msg) {
        Result result = new Result();
        result.msg = msg;
        result.code = 0;
        return result;
    }

}
这里还是要区别于简单工厂模式
工厂模式通过工厂类来创建对象,而不是直接使用 new 关键字。客户端只需要告诉工厂需要什么类型的对象,工厂负责创建并返回。
// 产品接口
interface Product {
    void use();
}

// 具体产品
class ConcreteProductA implements Product {
    public void use() { /* 实现 */ }
}

class ConcreteProductB implements Product {
    public void use() { /* 实现 */ }
}

// 工厂类
class SimpleFactory {
    public static Product createProduct(String type) {
        if ("A".equals(type)) {
            return new ConcreteProductA();
        } else if ("B".equals(type)) {
            return new ConcreteProductB();
        }
        return null;
    }
}
JWT令牌配置过程
这一过程发生在登录验证通过之后,连同令牌、用户数据封装到Result,响应给客户端;主要通过两个个类:JwtUtil,jwtProperties
这里不再过多赘述。前者功能是创建Jwt和解析Jwt,后者是装入(自动注入)配置文件中的Jwt属性。
可以补充JWT配合拦截器工作的过程
package com.sky.utils;

import io.jsonwebtoken.Claims;
import io.jsonwebtoken.JwtBuilder;
import io.jsonwebtoken.Jwts;
import io.jsonwebtoken.SignatureAlgorithm;
import java.nio.charset.StandardCharsets;
import java.util.Date;
import java.util.Map;

public class JwtUtil {
    /**
     * 生成jwt
     * 使用Hs256算法, 私匙使用固定秘钥
     *
     * @param secretKey jwt秘钥
     * @param ttlMillis jwt过期时间(毫秒)
     * @param claims    设置的信息
     * @return
     */
    public static String createJWT(String secretKey, long ttlMillis, Map<String, Object> claims) {
        // 指定签名的时候使用的签名算法,也就是header那部分
        SignatureAlgorithm signatureAlgorithm = SignatureAlgorithm.HS256;

        // 生成JWT的时间
        long expMillis = System.currentTimeMillis() + ttlMillis;
        Date exp = new Date(expMillis);

        // 设置jwt的body
        JwtBuilder builder = Jwts.builder()
                // 如果有私有声明,一定要先设置这个自己创建的私有的声明,这个是给builder的claim赋值,一旦写在标准的声明赋值之后,就是覆盖了那些标准的声明的
                .setClaims(claims)
                // 设置签名使用的签名算法和签名使用的秘钥
                .signWith(signatureAlgorithm, secretKey.getBytes(StandardCharsets.UTF_8))
                // 设置过期时间
                .setExpiration(exp);

        return builder.compact(); //对象转化为字符串
    }

    /**
     * Token解密
     *
     * @param secretKey jwt秘钥 此秘钥一定要保留好在服务端, 不能暴露出去, 否则sign就可以被伪造, 如果对接多个客户端建议改造成多个
     * @param token     加密后的token
     * @return
     */
    public static Claims parseJWT(String secretKey, String token) {
        // 得到DefaultJwtParser
        Claims claims = Jwts.parser()
                // 设置签名的秘钥
                .setSigningKey(secretKey.getBytes(StandardCharsets.UTF_8))
                // 设置需要解析的jwt
                .parseClaimsJws(token).getBody();
        return claims;
    }

}
@Component //交给spring管理
@ConfigurationProperties(prefix = "sky.jwt") //读取配置文件中的sky.jwt下的属性值注入到该配置类成员变量中
@Data
public class JwtProperties {

    /**
     * 管理端员工生成jwt令牌相关配置
     */
    private String adminSecretKey;
    private long adminTtl;
    private String adminTokenName;

    /**
     * 用户端微信用户生成jwt令牌相关配置
     */
    private String userSecretKey;
    private long userTtl;
    private String userTokenName;

}
前置后端开发流程
数据库设计–>接口设计–>后端开发
Mybatis数据库日志的配置
application.yml中的配置
logging:
  level:
    com:
      sky:
        mapper: debug
        service: info
        controller: info
实际效果:打印准备信息–>打印参数–>打印执行结果
2025-08-08 13:59:54.493 DEBUG 20276 --- [nio-8080-exec-6] com.sky.mapper.EmployeeMapper.insert     : ==>  Preparing: insert into employee (name, username, password, phone, sex, id_number, status, create_time, update_time, create_user, update_user) values (?, ?, ?, ?, ?, ?, ?, ?, ?, ?, ?)
2025-08-08 13:59:54.494 DEBUG 20276 --- [nio-8080-exec-6] com.sky.mapper.EmployeeMapper.insert     : ==> Parameters: 张三(String), user2(String), e10adc3949ba59abbe56e057f20f883e(String), 17654682212(String), 1(String), 411525200111230053(String), 1(Integer), 2025-08-08T13:59:54.493394300(LocalDateTime), 2025-08-08T13:59:54.493394300(LocalDateTime), 2(Long), 2(Long)
2025-08-08 13:59:54.500 DEBUG 20276 --- [nio-8080-exec-6] com.sky.mapper.EmployeeMapper.insert     : <==    Updates: 1
日志级别详解
# application.yml
logging:
  level:
    # 不同配置下的日志输出
    com.sky.mapper: trace  # 输出最详细信息
    com.sky.mapper: debug  # 输出SQL执行详情(当前配置)
    com.sky.mapper: info   # 只输出重要信息
    com.sky.mapper: warn   # 只输出警告和错误
SpringBoot内置日志实现和SLF4J的关系理解
SLF4J统一用户的日志输入,而实际的完成,也就是执行是由Logback统一实现。
✅ SLF4J 是给用户(包括框架)使用的统一日志接口 ✅ 底层默认基于 Logback 实现 ✅ application.yml 的日志配置最终由 Logback 解析执行 更完整的表述是: SLF4J 作为日志门面,为应用程序(包括用户代码、框架代码、第三方库)提供统一的日志 API,而 Logback 作为 Spring Boot 默认的日志实现,负责实际的日志输出工作,application.yml 中的配置最终由 Logback 来执行。
完整的架构图: ├── 业务逻辑日志 ──┐ ├── 框架使用日志 ──┤ └── 第三方库日志 ──┤ SLF4J (日志门面) └───────↓─────── Logback (具体实现, Spring Boot 默认) └───────↓─────── 控制台/文件输出
分页查询
返回结果:记录总数,分页数据(List)
/**
 * 封装分页查询结果
 */
@Data
@AllArgsConstructor
@NoArgsConstructor
public class PageResult implements Serializable {

    private long total; //总记录数

    private List records; //当前页数据集合

}
业务层,使用分页插件
    @Override
    public PageResult page(EmployeePageQueryDTO employeePageQueryDTO) {
        //自动计算 offset(起始位置) 和添加 LIMIT
        //        offset 计算:(pageNum - 1) * pageSize
        //该分页插件,基于拦截器实现,在sql执行前添加分页参数
        PageHelper.startPage(employeePageQueryDTO.getPage(), employeePageQueryDTO.getPageSize());

        Page<Employee> page = employeeMapper.page(employeePageQueryDTO);
        // page 包含:
        // - ArrayList 数据:[Employee1, Employee2, ..., Employee10]
        // - 分页信息:total=100, pageNum=1, pageSize=10,ollection<Employee>

        PageResult pageResult = new PageResult(page.getTotal(),page.getResult());
        //Page继承了ArrayList,ArrayList实现了List接口
        //故page.getResult()返回的是List<Employee>
        return pageResult;
    }
DAO,sql照常书写,而不用写limit
  <select id="page" resultType="com.sky.entity.Employee">
        select * from employee
        <where>
            <if test="name != null and name !=''">
                and name like concat('%',#{name},'%')
            </if>

        </where>
        order by create_time desc
--         分页插件会在这里加上 limit
    </select>
修改信息的逻辑处理
主要在前端完成回显和修改提交的连贯动作,这两个异步操作,对应后端的一个根据id查询,一个更新操作。总结来就是,前端分别写,but连贯调用,后端分别写即可。
注意update中若where未写,可能带来灾难性后果:数据污染,整个员工表的信息都被修改;
但是本项目之前实现了全局异常处理器,针对重复添加信息做了一个全局异常处理,现在没写where的update仅仅会导致异常,而不会造成数据污染。
   @ExceptionHandler
    public Result exceptionHandler(SQLIntegrityConstraintViolationException ex){
        log.error("异常信息:{}", ex.getMessage());
        String message = ex.getMessage();
        if(message.contains("Duplicate entry")){
            String[] split = message.split(" ");
            //报错信息是:Duplicate entry 'admin' for key 'idx_username'
            //以空格分割,获取用户名(正好对应索引2)
            String userName = split[2];
            String msg = userName + MessageConstant.AlREADY_EXISTS;
            return Result.error(msg);
        }else{
            return Result.error(MessageConstant.UNKNOWN_ERROR);
        }
    }
<update id="update" parameterType="Employee">
     update employee
     <set>
         <if test="username != null">
             username=#{username},
         </if>
         <if test="name != null">
              name=#{name},
         </if>
         <if test="password != null">
             password=#{password},
         </if>
          <if test="phone != null">
              phone=#{phone},
          </if>
         <if test="sex != null">
             sex=#{sex},
         </if>
          <if test="idNumber != null">
              id_number=#{idNumber},
          </if>
         <if test="status != null">
             status=#{status},
         </if>
          <if test="updateTime != null">
              update_time=#{updateTime},
          </if>
          <if test="updateUser != null">
              update_user=#{updateUser},

          </if>
     </set>
-- 这里别忘了where
    where id=#{id}
    </update>
公共字段填充ByAOP切面编程
首先自定义注解,需要填充公共字段的Mapper方法上加上此注解,定义切面类拦截添加了指定注解的方法,进行公共字段填充。
1.自定义注解
@Target(ElementType.METHOD)
@Retention(RetentionPolicy.RUNTIME)
public @interface AutoFill {
    //value()是默认属性,当且仅有一个属性时,value()可以省略
    OperationType value();
}
OperationType枚举类
package com.sky.enumeration;

/**
 * 数据库操作类型
 */
public enum OperationType {

    /**
     * 更新操作
     */
    UPDATE,

    /**
     * 插入操作
     */
    INSERT

}
枚举类的使用
// 1.使用枚举常量
OperationType.INSERT  // 引用插入操作
OperationType.UPDATE  // 引用更新操作

//2.配合注解使用
@AutoFill(OperationType.INSERT)
public void saveUser(User user) {

}

//3.在判断条件中使用
public void handleOperation(OperationType operationType) {
    if (operationType == OperationType.INSERT) {
        // 处理插入操作逻辑
        System.out.println("执行插入操作");
    } else if (operationType == OperationType.UPDATE) {
        // 处理更新操作逻辑
        System.out.println("执行更新操作");
    }
}
对比注解中多个属性与单个属性的定义及使用
//多个属性的定义
public @interface MyAnnotation {
    String value();           // 默认属性
    String name() default ""; // 带默认值的属性
    int age() default 0;      // 带默认值的属性
    boolean enabled() default true; // 带默认值的属性
}

//多个属性的使用
// 只使用默认属性
@MyAnnotation("test") //等效于@MyAnnotation(value = "test")

// 使用多个属性(不能省略属性名)
@MyAnnotation(
    value = "test",
    name = "张三",
    age = 25
)
2.定义切面类
切面类AutoFillAspect,包含:一个切入点方法(配上@Pointcut注解),一个字段填充方法(配上@before注解)
@Pointcut注解中配置要拦截的目标
@before注解中配置上切点方法的名称,则该方法在切点方法所拦截的所有方法执行前执行。
工作流程:启动应用->springAop解析@Pointcut表达式(找到该表达式的所有方法)
->匹配表达式的方法被调用时执行@before注解的方法
->执行原理的匹配表达式的方法
package com.sky.aspect;

import com.sky.annotation.AutoFill;
import com.sky.constant.AutoFillConstant;
import com.sky.context.BaseContext;
import com.sky.enumeration.OperationType;
import org.aspectj.lang.reflect.MethodSignature;
import lombok.extern.slf4j.Slf4j;
import org.aspectj.lang.JoinPoint;
import org.aspectj.lang.annotation.Aspect;
import org.aspectj.lang.annotation.Before;
import org.aspectj.lang.annotation.Pointcut;
import org.springframework.stereotype.Component;

import java.lang.reflect.Method;
import java.time.LocalDateTime;
import java.time.LocalTime;

@Slf4j
@Aspect
@Component
public class AutoFillAspect {
    /**
     * 切入点
     *
     * @param
     */
//1.定义切入点:   匹配 com.sky.mapper 包下所有类的所有带AutoFill注解的方法
    @Pointcut("execution(* com.sky.mapper.*.*(..)) && @annotation(com.sky.annotation.AutoFill)")
    public void autoFillPointCut() {

    }
    /**
     * 拦截需要自动填充的函数
     *
     * @param joinPoint
     */
    @Before("autoFillPointCut()")
//2.在切入点方法执行前执行
    public void autoFill(JoinPoint joinPoint) {
        log.info("开始进行数据填充-----------------------------------------------------------------------------------");
        MethodSignature signature = (MethodSignature) joinPoint.getSignature();
        //MethodSignature包含了被拦截方法的详细信息(名称、参数类型、返回值类型、方法所在类等)
        //1.获取注解对象
        //getMethod 返回一个Method对象,Method类包含了方法的所有详细信息(方法名、参数类型、返回类型、注解等
        //getAnnotation从 Method 对象中获取指定类型的注解
        AutoFill autoFill = signature.getMethod().getAnnotation(AutoFill.class);
        //2.获取当前操作(插入or更新)
        OperationType operationType = autoFill.value();
        //3.获取方法参数(就是我们要处理的对象)
        Object[] args = joinPoint.getArgs();
        if (args == null || args.length == 0) {
            return;
        }
        Object object = args[0];
        //4.准备赋值的数据
        LocalDateTime now = LocalDateTime.now();
        Long currentId = BaseContext.getCurrentId();
        //5.根据对应的操作类型,为对应的属性赋值
        if (operationType == OperationType.INSERT) {
            //通过Class对象来获取实体对象的方法信息
            try {
                //getDeclaredMethod可以获取实体对象中的非public方法,而getMethod只能获取public方法
                //getDeclaredMethod的两个参数分别为:方法名,参数类型
                Method setCreateTime = object.getClass().getDeclaredMethod(AutoFillConstant.SET_CREATE_TIME, LocalDateTime.class);
                Method setUpdateTime = object.getClass().getDeclaredMethod(AutoFillConstant.SET_UPDATE_TIME, LocalDateTime.class);
                Method setCreateUser = object.getClass().getDeclaredMethod(AutoFillConstant.SET_CREATE_USER, Long.class);
                Method setUpdateUser = object.getClass().getDeclaredMethod(AutoFillConstant.SET_UPDATE_USER, Long.class);

                //调用setXxx方法
                setCreateTime.invoke(object, now);
                setUpdateTime.invoke(object, now);
                setCreateUser.invoke(object, currentId);
                setUpdateUser.invoke(object, currentId);
            }catch (Exception e){
                e.printStackTrace();
            }
        }
        if (operationType == OperationType.UPDATE) {
            try {
                Method setUpdateTime = object.getClass().getDeclaredMethod(AutoFillConstant.SET_UPDATE_TIME, LocalDateTime.class);
                Method setUpdateUser = object.getClass().getDeclaredMethod(AutoFillConstant.SET_UPDATE_USER, Long.class);
                setUpdateTime.invoke(object, now);
                setUpdateUser.invoke(object, currentId);
            } catch (Exception e) {
                e.printStackTrace();
            }
        }
    }

}
3.使用注解(自定义的@AutoFill)
EmployeeMapper.java
    /**
     * 添加用户
     *
     * @param employee
     */
    @AutoFill(value = OperationType.INSERT)
    @Insert("insert into employee (name, username, password, phone, sex, id_number, status, create_time, update_time, create_user, update_user) " +
            "values (#{name}, #{username}, #{password}, #{phone}, #{sex}, #{idNumber}, #{status}, #{createTime}, #{updateTime}, #{createUser}, #{updateUser})")
    void insert(Employee employee);

    /**
     * 更新员工信息
     *
     * @param employee
     */
    @AutoFill(value = OperationType.UPDATE)
    void update(Employee employee);
补充
- @Component和@Bean的区别:
前者不标注在方法上,后者标准在方法上
前者多用于业务中的类进行对象创建,后者则多为第三方组件创建对象,其中后者往往自定义对象的创建过程(这在创建 Swagger 文档配置实例时,得到体现)
常见的Taget选项及@Component和@Bean
@Target({
    ElementType.TYPE,           // 类、接口、注解、枚举
    ElementType.METHOD,         // 方法
    ElementType.FIELD,          // 字段(包括枚举常量)
    ElementType.PARAMETER,      // 参数
    ElementType.CONSTRUCTOR,    // 构造函数
    ElementType.LOCAL_VARIABLE, // 局部变量
    ElementType.ANNOTATION_TYPE // 注解类型
})


@Target({ElementType.TYPE})
@Retention(RetentionPolicy.RUNTIME)
@Documented
@Indexed
public @interface Component {
    String value() default "";
}
创建 Swagger 文档配置实例的例子
    /**
     * 通过knife4j生成接口文档
     * @return
     */
    //这里自定义了对象的创建过程,并最终返回bean给spring管理
    @Bean
    public Docket docket() {
        ApiInfo apiInfo = new ApiInfoBuilder()
                .title("苍穹外卖项目接口文档")
                .version("2.0")
                .description("苍穹外卖项目接口文档")
                .build();
        Docket docket = new Docket(DocumentationType.SWAGGER_2)
                .apiInfo(apiInfo)
                .select()
                .apis(RequestHandlerSelectors.basePackage("com.sky.controller"))
                .paths(PathSelectors.any())
                .build();
        return docket;
    }
实例对象区别Class对象 Instance Object 是一个类的具体实例,存储在堆中,包含实际数据; Class Object 是对一个类的结构的描述,存储在方法区中,且是单例模式创建的(每个实体对象的类有且仅有一个Class对象在JVM中) 通过获取一个对象的Class Object得到该对象类的结构信息,再提取其方法,使用反射便可调用方法再实体对象上执行
// 1. 创建实体对象
Employee employee = new Employee();
employee.setId(1L);
employee.setName("张三");

// 2. 获取 Class Object
Class<?> clazz = employee.getClass();

// 3. 提取其参数为LocalDateTime的setCreateTime方法
Method setCreateTimeMethod = clazz.getDeclaredMethod("setCreateTime", LocalDateTime.class);
LocalDateTime now = LocalDateTime.now();
//4.使用反射调用该方法
setCreateTimeMethod.invoke(employee, now);  // 相当于 employee.setCreateTime(now)
// 还可通过以下方法获取实体对象的Class Object // 方式2:类名. classClass clazz2 = Employee.class; // 方式3:Class.forName() 方法 Class clazz3 = Class.forName(“com.sky.entity.Employee”); // 方式4:通过类加载器 Class clazz4 = Employee.class.getClassLoader().loadClass(“com.sky.entity.Employee”);
## 数据库多表查询

### 预编译参数#{ }

`<if test="categoryId != null"> and d.category_id = #{categoryId} </if>` MyBatis会通过反射调用 getCategoryId() 方法获取属性值,判断是否为null,不为null则为当前sql拼接上`and d.category_id = #{categoryId}`;其中 #{categoryId}是动态sql,能够避免sql注入;要注意Mybatis中的动态sql不同于我们在其它技术栈中说的动态sql(单单的拼接sql),如这里的#{ }其底层就是JDBC的参数化sql(可以防止sql注入)

**一般的sql注入示例**

```java
-- 原始SQL意图:根据分类ID查询菜品
SELECT * FROM dish WHERE category_id = ?

-- 如果直接拼接字符串,攻击者输入: 1 OR 1=1
-- 恶意SQL变成:
SELECT * FROM dish WHERE category_id = 1 OR 1=1  -- 这会返回所有菜品!
#{ }方式为何可以避免sql注入
#{}底层采用JDBC的占位符方式进行参数插入,调用数据库驱动的方法(如setLong,setString等)进行参数插入;
当攻击者输入不法参数时,要么抛出异常(如下面2中的例子),要么统一作为字符串处理(如下面3的例子)
// 1. 准备SQL语句
String sql = "SELECT * FROM dish WHERE category_id = ?";
PreparedStatement ps = connection.prepareStatement(sql);

// 2. 设置参数(即使输入恶意内容也安全)
String maliciousInput = "1 OR 1=1";
ps.setLong(1, Long.parseLong(maliciousInput)); // 会抛出NumberFormatException

// 或者更常见的情况,输入是字符串但按Long处理
ps.setString(1, "1 OR 1=1"); // 会被当作普通字符串

// 3. 实际执行的查询
// 等价于: SELECT * FROM dish WHERE category_id = '1 OR 1=1'
// 结果:找不到匹配记录,不会造成安全问题
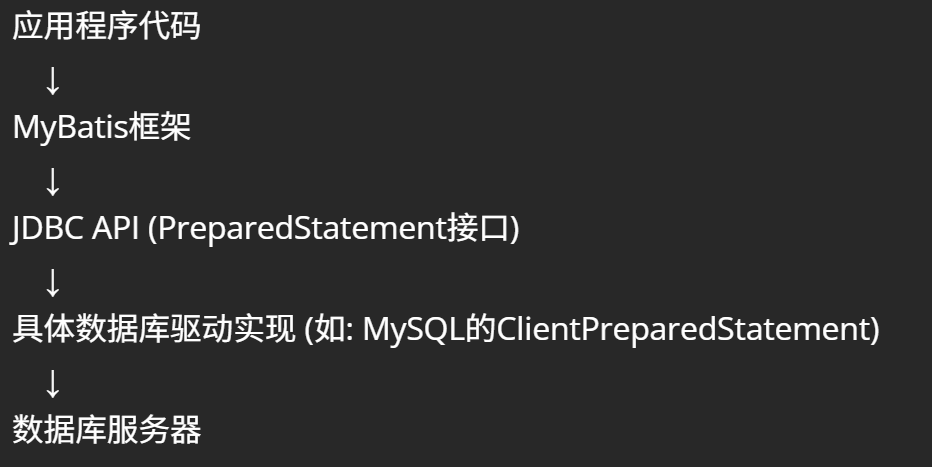
运行时的对象关系:MyBatis 等 ORM 框架正是基于PreparedStatement 来实现安全的数据库操作
AS与Mybatis自动映射
select d.*, c.name as categoryNameMyBatis 根据列名自动映射到 DishVO 对象的对应属性
也就是将categoryName映射到结果对象DishVO的属性categoryName;同时也防止了菜品name和分类name重复(as为categoryName);
项目中的DIshVO:
可以看到有两个name,一个是name(菜品名称),另一个是categoryName(分类名称),而此二者在其对应的数据库表中字段均为name,故此,为了避免同名冲突和映射冲突并发挥mybatis自动映射的特性,才使用as 将 category表中的name 别名为categoryName。
public class DishVO implements Serializable {

    private Long id;
    //菜品名称
    private String name;
    //菜品分类id
    private Long categoryId;
    //菜品价格
    private BigDecimal price;
    //图片
    private String image;
    //描述信息
    private String description;
    //0 停售 1 起售
    private Integer status;
    //更新时间
    private LocalDateTime updateTime;


    //分类名称
    private String categoryName;
    //菜品关联的口味
    private List<DishFlavor> flavors = new ArrayList<>();

    //private Integer copies;
}
简述文件上传到阿里云OSS
配置oss信息(yml中),

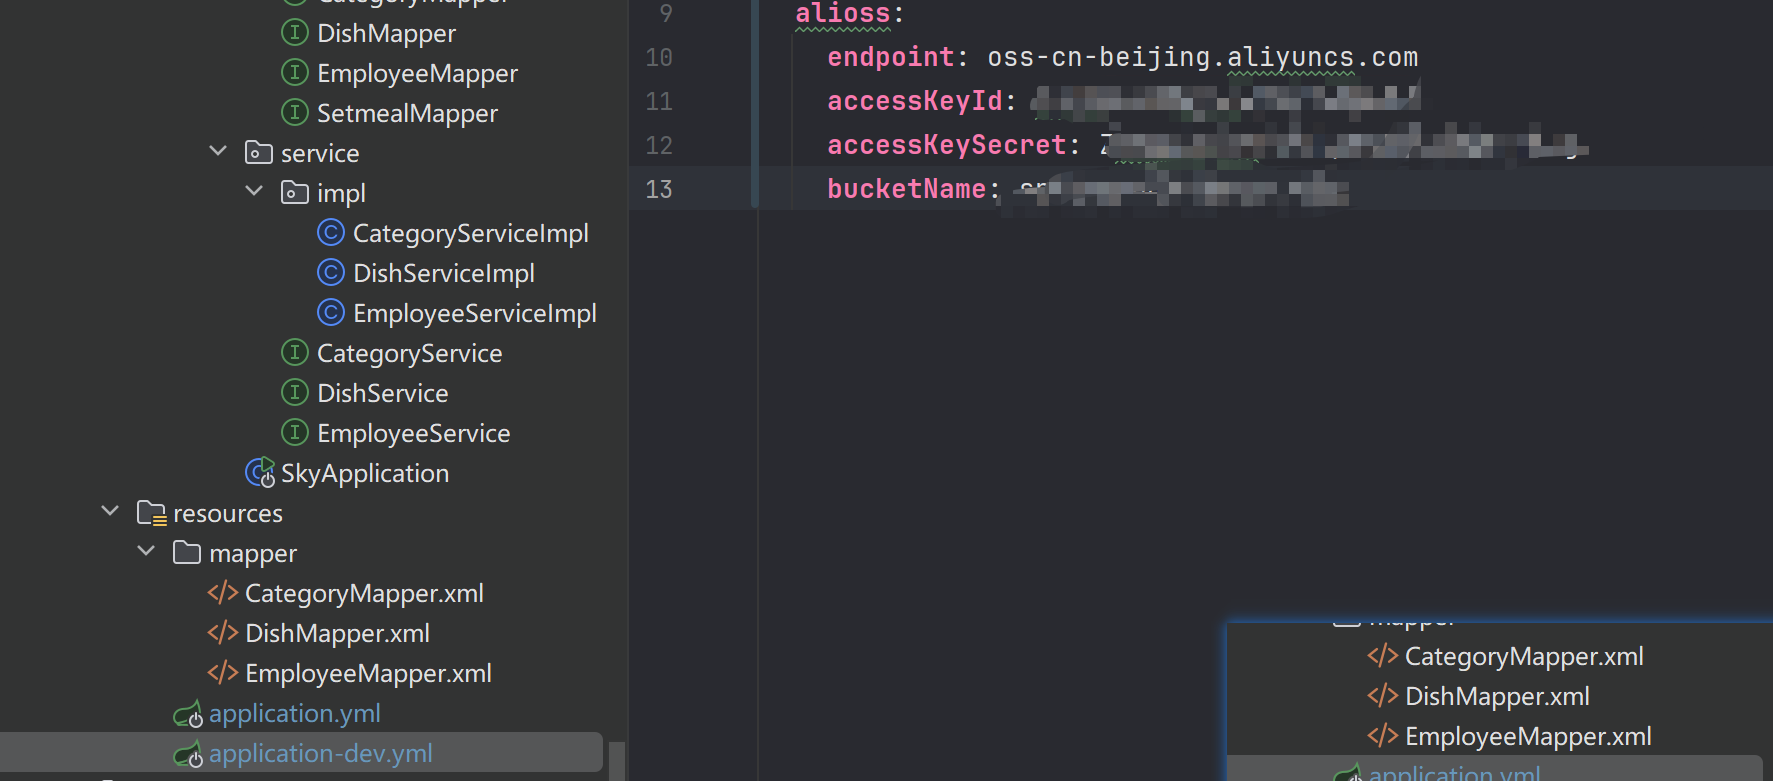
创建对应的属性类用于注入oss信息,
@Component
@ConfigurationProperties(prefix = "sky.alioss")
@Data
public class AliOssProperties {

    private String endpoint;
    private String accessKeyId;
    private String accessKeySecret;
    private String bucketName;

}
创建配置类,用于自定义阿里云oss工具类实例的创建
@Slf4j
@Configuration
public class OssConfiguration {
    @Bean
    @ConditionalOnMissingBean//单例创建工具类
    public AliOssUtil aliOssUtil(AliOssProperties aliOssProperties) {
        log.info("开始创建阿里云文件上传工具类对象:{}", aliOssProperties);
        return new AliOssUtil(aliOssProperties.getEndpoint(), aliOssProperties.getAccessKeyId(), aliOssProperties.getAccessKeySecret(), aliOssProperties.getBucketName());
    }
}
定义控制器
@Slf4j
@RestController
@RequestMapping("/admin/common")
public class CommonController {
    @Autowired
    private AliOssUtil aliOssUtil;
    @PostMapping("/upload")
    public Result<String> upload(MultipartFile file) {
        log.info("文件上传:{}", file.getOriginalFilename());
        try {
            //重命名文件
            String fileName = System.currentTimeMillis() + "." + file.getOriginalFilename().split("\\.")[1];

            //上传文件到阿里云oss,并返回url
            String url = aliOssUtil.upload(file.getBytes(), fileName);
            return Result.success(url);
        } catch (IOException e) {
            log.error("文件上传失败:{}", e);
        }
        return Result.error(MessageConstant.UPLOAD_FAILED);
    }
}
理解Mybatis中的批量添加处理
parameterType="list"指定接收参数为list;
下面的foreach 将进行sql语句拼接,以实现批量数据插入
  <insert id="insertBatch" parameterType="list">
        insert into setmeal_dish (setmeal_id, dish_id, name, price, copies) values
        <foreach collection="list" item="item" separator=",">
            (#{item.setmealId},#{item.dishId},#{item.name},#{item.price},#{item.copies})
        </foreach>
    </insert>
拼接效果如下:
insert into setmeal_dish (setmeal_id, dish_id, name, price, copies) values
(1, 10, '宫保鸡丁', 19.9, 2),
(1, 11, '鱼香肉丝', 18.9, 1)
理解PageHelper
下面是一段套餐管理的分页查询业务代码
    public PageResult pageQuery(SetmealPageQueryDTO setmealPageQueryDTO) {
//        将分页参数(页码和每页大小)存储到 ThreadLocal 中
//        通知 PageHelper 下一个执行的查询需要进行分页处理
//        页码和每页大小从 SetmealPageQueryDTO 对象中获取
        PageHelper.startPage(setmealPageQueryDTO.getPage(), setmealPageQueryDTO.getPageSize());
//        PageHelper 拦截这个查询,自动在 SQL 语句中添加 LIMIT 子句
//        查询结果被封装到 Page 对象中,Page 是 PageHelper 提供的一个特殊 List 实现,包含了分页信息
        Page<SetmealVO> page = setmealMapper.pageQuery(setmealPageQueryDTO);
        PageResult pageResult = new PageResult(page.getTotal(),page.getResult());
        return pageResult;
    }
举个例子演示PageHelper的工作流程
假设前端传入的参数为:
{
  "page": 1,
  "pageSize": 10,
  "name": "商务套餐",
  "categoryId": 5,
  "status": 1
}
PageHelper.startPage(1, 10) 将分页信息存储到 ThreadLocal; 执行 pageQuery 查询时,PageHelper 拦截该查询,将 SQL 改造为:
   select s.*,c.name as categoryName
   from setmeal s
   left join category c on s.category_id = c.id
   WHERE (s.name like concat('%','商务套餐','%') AND s.category_id = 5 AND s.status = 1)
   order by s.create_time desc
   LIMIT 0, 10
同时还会执行一条 count 查询获取总记录数:
   select count(*)
   from setmeal s
   left join category c on s.category_id = c.id
   WHERE (s.name like concat('%','商务套餐','%') AND s.category_id = 5 AND s.status = 1)
最终返回包含 10 条记录和总记录数的 PageResult 对象
而在手动分页查询中(代码如下),不仅要手动计算分页中的页码,还需要分别查询分页数据和统计数据总数
// ... existing code ...
    /**
     * 手动分页实现(使用@Param注解传递参数)
     * @param employeePageQueryDTO
     * @return
     */
    public PageResult pageManualWithParam(EmployeePageQueryDTO employeePageQueryDTO) {
        // 1. 计算偏移量
        int offset = (employeePageQueryDTO.getPage() - 1) * employeePageQueryDTO.getPageSize();

        // 2. 查询当前页数据
        List<Employee> employees = employeeMapper.pageManualWithParam(
            employeePageQueryDTO.getName(),
            offset,
            employeePageQueryDTO.getPageSize()
        );

        // 3. 查询总记录数
        Long total = employeeMapper.countManualWithParam(employeePageQueryDTO.getName());

        // 4. 封装分页结果
        PageResult pageResult = new PageResult(total, employees);
        return pageResult;
    }
// ... existing code ...
Mapper接口,使用@Param注解多个参数,MyBatis 会在内部创建一个类似这样的 Map
Map<String, Object> paramMap = new HashMap<>();
paramMap.put("name", name);
paramMap.put("offset", offset);
paramMap.put("pageSize", pageSize);
// ... existing code ...
    /**
     * 分页查询(手动分页版本,使用@Param注解)
     *
     * @param name 员工姓名
     * @param offset 偏移量
     * @param pageSize 页面大小
     * @return
     */
    List<Employee> pageManualWithParam(@Param("name") String name,
                                       @Param("offset") int offset,
                                       @Param("pageSize") int pageSize);

    /**
     * 查询总记录数(手动分页版本,使用@Param注解)
     *
     * @param name 员工姓名
     * @return
     */
    Long countManualWithParam(@Param("name") String name);
// ... existing code ...
动态sql部分,在使用@Param注解的参数时,输入key即可,就像实体类一样使用(本来就是创建了一个map管理@Param注解的参数),若接口中不使用此注解,则传入的参数将在动态sql的xml中按照使用位置进行匹配
// ... existing code ...
    <select id="pageManualWithParam" resultType="com.sky.entity.Employee">
        select * from employee
        <where>
            <if test="name != null and name !=''">
                and name like concat('%',#{name},'%')
            </if>
        </where>
        order by create_time desc
        limit #{offset}, #{pageSize}
    </select>

    <select id="countManualWithParam" resultType="java.lang.Long">
        select count(*) from employee
        <where>
            <if test="name != null and name !=''">
                and name like concat('%',#{name},'%')
            </if>
        </where>
    </select>
// ... existing code ...
接口中去除@Param,参数将按位置匹配的例子
<select id="pageManualWithParam" resultType="com.sky.entity.Employee">
    select * from employee
    <where>
        <if test="param1 != null and param1 !=''">
            and name like concat('%',#{param1},'%')
        </if>
    </where>
    order by create_time desc
    limit #{param2}, #{param3}
</select>
mybatis结果类型设置
下面是一个mapper接口,像这样List<> ,动态sql中设置返回参数类型为<>里面的即可
@Mapper
public interface SetmealDishMapper {

    List<Long> getSetmealIdListByDishId(List<Long> ids);

    void insertBatch(List<SetmealDish> setmealDishes);

    List<SetmealDish> getSetmealDishBySetmealId(Long id);
}
动态sql中的配置
mapper namespace="com.sky.mapper.SetmealDishMapper">
    <select id="getSetmealIdListByDishId" resultType="java.lang.Long">
        select setmeal_id from setmeal_dish where dish_id in
        <foreach collection="ids" item="id" separator="," open="(" close=")">
            #{id}
        </foreach>
    </select>


    <insert id="insertBatch" parameterType="list">
        insert into setmeal_dish (setmeal_id, dish_id, name, price, copies) values
        <foreach collection="list" item="item" separator=",">
            (#{item.setmealId},#{item.dishId},#{item.name},#{item.price},#{item.copies})
        </foreach>
    </insert>

    <select id="getSetmealDishBySetmealId" resultType="com.sky.entity.SetmealDish">
        select * from setmeal_dish where setmeal_id = #{id}
    </select>
</mapper>
Redis连接的配置
关于yml文件
下面的这个配置必须写在Spring: 之下,只有这样Spring Boot才能成功的从配置文件中读取Redis配置并创建相应的连接工厂。
Spring Boot提供了自动配置功能,它会自动读取application.yml或application.properties中以spring.redis开头的配置项,并自动创建所需的Bean,包括:
LettuceConnectionFactory(如果使用Lettuce客户端)
RedisTemplate
StringRedisTemplate(本项目中手动实例化了该类,是为了配置redis key的序列化器)

如果yml文件中redis的配置信息没有写在Spring下,springboot将无法进行自动化读取并配置,这时需要我们手动读取配置并进行相关数据注入
package com.sky.config;

import lombok.extern.slf4j.Slf4j;
import org.springframework.beans.factory.annotation.Value;
import org.springframework.context.annotation.Bean;
import org.springframework.context.annotation.Configuration;
import org.springframework.data.redis.connection.RedisConnectionFactory;
import org.springframework.data.redis.connection.RedisStandaloneConfiguration;
import org.springframework.data.redis.connection.lettuce.LettuceConnectionFactory;
import org.springframework.data.redis.core.RedisTemplate;
import org.springframework.data.redis.serializer.StringRedisSerializer;

@Configuration
@Slf4j
public class RedisConfiguration {

    @Value("${sky.redis.host:localhost}")
    private String redisHost;

    @Value("${sky.redis.port:6379}")
    private int redisPort;

//    @Value("${sky.redis.username:default}")
//    private String redisUsername;

    @Value("${sky.redis.password:}")
    private String redisPassword;

    @Value("${sky.redis.database:0}")
    private int redisDatabase;

    @Bean
    public LettuceConnectionFactory redisConnectionFactory() {
        RedisStandaloneConfiguration config = new RedisStandaloneConfiguration();
        config.setHostName(redisHost);
        config.setPort(redisPort);
//        config.setUsername(redisUsername);
        if (redisPassword != null && !redisPassword.isEmpty()) {
            config.setPassword(redisPassword);
        }
        config.setDatabase(redisDatabase);
        return new LettuceConnectionFactory(config);
    }

//如果redis配置写在yml中的spring下,则仅需此配置即可
    @Bean
    public RedisTemplate redisTemplate(RedisConnectionFactory redisConnectionFactory) {
        log.info("开始创建RedisTemplate对象...");
        RedisTemplate redisTemplate = new RedisTemplate();
        redisTemplate.setConnectionFactory(redisConnectionFactory);
        redisTemplate.setKeySerializer(new StringRedisSerializer());
//        redisTemplate.setValueSerializer(new StringRedisSerializer());
        return redisTemplate;
    }
}
SpringMVC拦截器的配置
编写一个拦截器类
package com.sky.interceptor;

import com.sky.constant.JwtClaimsConstant;
import com.sky.context.BaseContext;
import com.sky.properties.JwtProperties;
import com.sky.utils.JwtUtil;
import io.jsonwebtoken.Claims;
import lombok.extern.slf4j.Slf4j;
import org.springframework.beans.factory.annotation.Autowired;
import org.springframework.stereotype.Component;
import org.springframework.web.method.HandlerMethod;
import org.springframework.web.servlet.HandlerInterceptor;

import javax.servlet.http.HttpServletRequest;
import javax.servlet.http.HttpServletResponse;

/**
 * jwt令牌校验的拦截器
 */
@Component
@Slf4j
public class JwtTokenUserInterceptor implements HandlerInterceptor {

    @Autowired
    private JwtProperties jwtProperties;

    /**
     * 校验jwt
     *
     * @param request
     * @param response
     * @param handler
     * @return
     * @throws Exception
     */
    public boolean preHandle(HttpServletRequest request, HttpServletResponse response, Object handler) throws Exception {
        //判断当前拦截到的是Controller的方法还是其他资源
        if (!(handler instanceof HandlerMethod)) {
            //当前拦截到的不是动态方法,直接放行
            return true;
        }

        //1、从请求头中获取令牌
        String token = request.getHeader(jwtProperties.getUserTokenName());

        //2、校验令牌
        try {
            log.info("jwt校验:{}", token);
            Claims claims = JwtUtil.parseJWT(jwtProperties.getUserSecretKey(), token);
            Long userId = Long.valueOf(claims.get(JwtClaimsConstant.USER_ID).toString());
            log.info("当前用户id:", userId);
            //员工id放入threadlocal,供service层使用
            BaseContext.setCurrentId(userId);
            //3、通过,放行
            return true;
        } catch (Exception ex) {
            //4、不通过,响应401状态码
            response.setStatus(401);
            return false;
        }
    }
}
在配置类中注册拦截器(匹配到什么路由时触发什么拦截器)
 * 配置类,注册web层相关组件
 */
//通过@Component注解,Spring会自动扫描并创建JwtTokenAdminInterceptor和JwtTokenUserInterceptor实例。
@Configuration //区别于@Component, @Configuration用于定义配置类,被Spring容器管理
@Slf4j
public class WebMvcConfiguration extends WebMvcConfigurationSupport {

    @Autowired
    private JwtTokenAdminInterceptor jwtTokenAdminInterceptor;
    @Autowired
    private JwtTokenUserInterceptor jwtTokenUserInterceptor;

    /**
     * 注册自定义拦截器
     *
     * @param registry
     */
    protected void addInterceptors(InterceptorRegistry registry) {
//        1.注册后台拦截器
        log.info("开始注册自定义拦截器...");
        registry.addInterceptor(jwtTokenAdminInterceptor)
                .addPathPatterns("/admin/**")
                .excludePathPatterns("/admin/employee/login");
//          2.注册用户拦截器
        registry.addInterceptor(jwtTokenUserInterceptor)
                .addPathPatterns("/user/**")
                .excludePathPatterns("/user/user/login")
                .excludePathPatterns("/user/shop/status");
    }
}
拦截器执行流程:
当HTTP请求到达时,Spring MVC会按照以下流程处理: DispatcherServlet接收请求 根据请求URL匹配合适的HandlerMapping HandlerMapping根据注册的拦截器配置,确定哪些拦截器需要应用到当前请求 按顺序执行拦截器的preHandle方法 如果所有拦截器都返回true,才执行目标Controller方法 Controller执行完成后,按相反顺序执行拦截器的postHandle方法(如果有的话) 最后执行afterCompletion方法(如果有的话)
注意:拦截器对象由Spring通过@Component注解自动创建 拦截器注册方法addInterceptors由Spring MVC框架在初始化时自动调用 拦截器生效是通过Spring MVC框架自动匹配请求路径和拦截器配置实现的 整个过程是自动的,基于Spring框架的机制实现。
实现缓存的两种方式
方式1:手动清除/存储缓存
查询方法中进行缓存数据,增,删,改方法中进行清除缓存
缓存数据
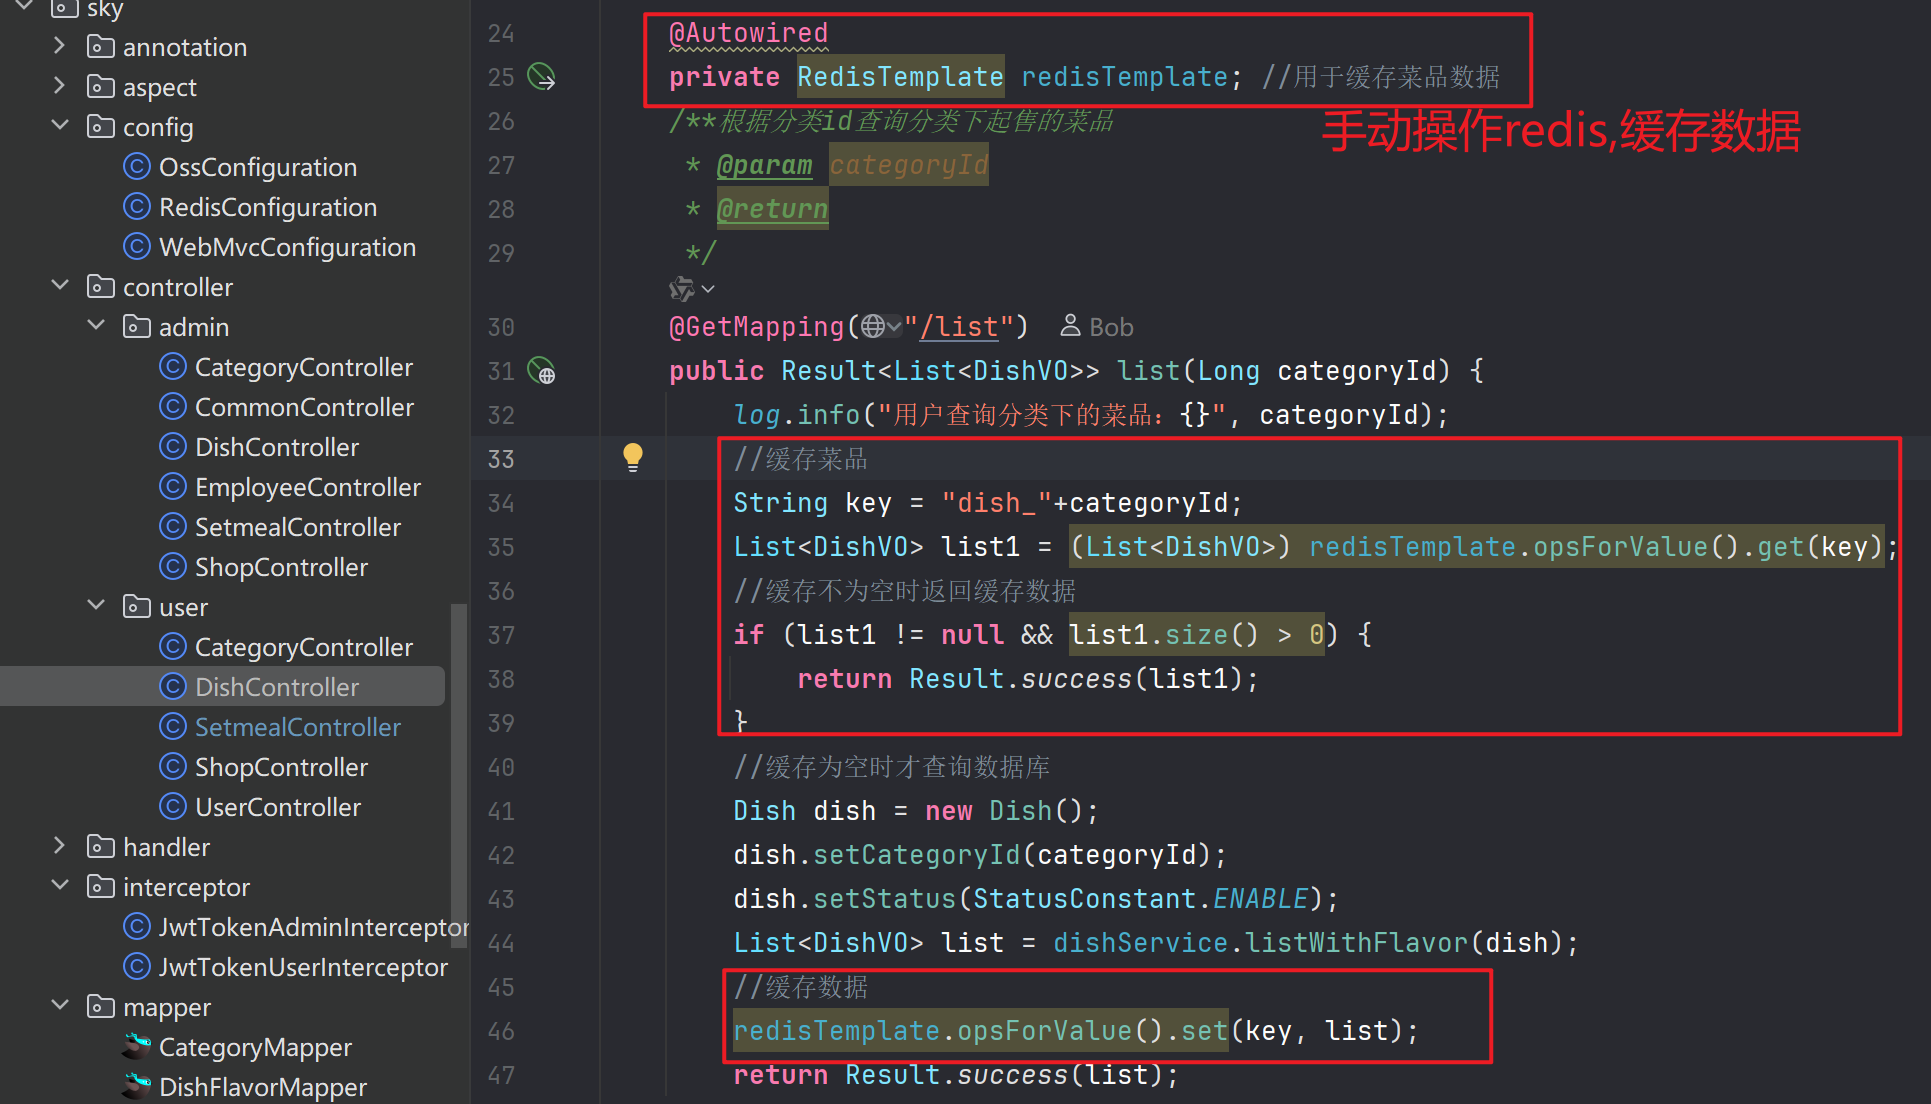
清除缓存
    private void cleanCache(String pattern){
        Set Keys = redisTemplate.keys(pattern); //获取所有匹配的key
        redisTemplate.delete(Keys); //删除这些key
    }
         /**批量删除菜品
     * @param ids
     * @return
     */
    @DeleteMapping
    //注意前端请求是/admin/dish?ids=1,2,3 这不是RESTful风格
    public Result delete(@RequestParam List<Long> ids){
        log.info("删除菜品,id为:{}",ids);
        dishService.delete(ids);
        String key = "dish_*"; //删除所有以dish_开头的key
        cleanCache( key);
        return Result.success();
    }

    @PutMapping
    public Result update(@RequestBody DishDTO dishDTO){
        log.info("编辑菜品,参数:{}",dishDTO);
        dishService.update(dishDTO);
        String key = "dish_*"; //删除所有以dish_开头的key
        cleanCache( key);
        return Result.success();
    }

       @PostMapping("/status/{status}")
    public Result startOrStop(@PathVariable Integer status, @RequestParam Long id){
        log.info("启用或禁用菜品,状态:{},id:{}",status,id);
        dishService.startOrStop(status,id);
        String key = "dish_*"; //删除所有以dish_开头的key
        cleanCache( key);
        return Result.success();

    }

       @PostMapping
    public Result save(@RequestBody DishDTO dishDTO){
        log.info("新增菜品,参数:{}",dishDTO);
        dishService.save(dishDTO);
        String key = "dish_" + dishDTO.getCategoryId();
        cleanCache(key);
        return Result.success();
    }
方式二:SpringCache 注解式实现缓存数据,清除数据
引入mvn坐标
   <dependency>
            <groupId>org.springframework.boot</groupId>
            <artifactId>spring-boot-starter-data-redis</artifactId>
        </dependency>

        <dependency>
            <groupId>org.springframework.boot</groupId>
            <artifactId>spring-boot-starter-cache</artifactId>
        </dependency>
启动类上加入注解@EnableCaching
@SpringBootApplication
@EnableTransactionManagement //开启注解方式的事务管理
@Slf4j
@EnableCaching
public class SkyApplication {
    public static void main(String[] args) {
        SpringApplication.run(SkyApplication.class, args);
        log.info("server started");
    }
}
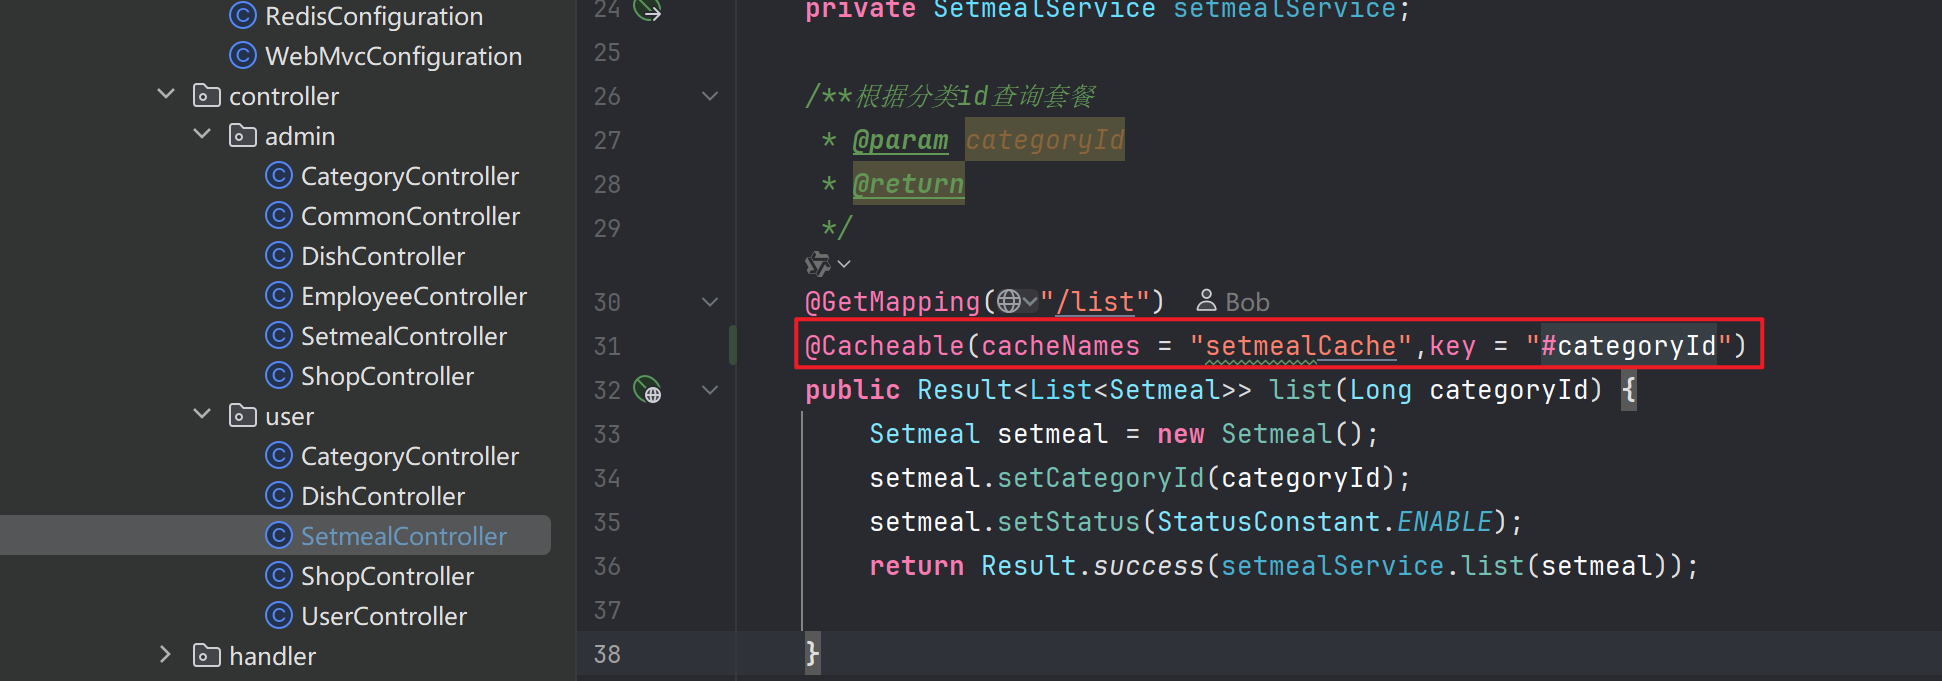
需要缓存数据的方法上加上注解@Cacheable(cacheNames = "setmealCache",key = "#categoryId") 注解内容自定义
在相应地更新/删除/添加数据的方法上加入注解
Spring Task
用于执行定时任务。
配置流程:
启动类添加注解
@EnableScheduling编写处理函数和定时公式(在自定义的task类中)
package com.sky.task;

import com.sky.entity.Orders;
import com.sky.mapper.OrderMapper;
import lombok.extern.slf4j.Slf4j;
import org.springframework.beans.factory.annotation.Autowired;
import org.springframework.scheduling.annotation.Scheduled;
import org.springframework.stereotype.Component;

import java.time.LocalDate;
import java.time.LocalDateTime;
import java.util.Date;
import java.util.List;

@Slf4j
@Component
public class MyTask {
    @Autowired
    private OrderMapper orderMapper;
//    @Scheduled(cron = "0 * * * * ?")
//    public void executeTask(){
//        log.info("定时任务开始执行:{}",new Date());
//
//
//    }
    @Scheduled(cron = "0 * * * * ?")
    public void processTimeOut(){
        //1.查询超时订单:根据订单状态和下单时间查询
        log.info("处理超时订单:{}",new Date());
        LocalDateTime time = LocalDateTime.now().plusMinutes(-15);
        List<Orders> ordersList = orderMapper.getByStatusAndOrderTimeLT(Orders.PENDING_PAYMENT,time);
        if(ordersList != null && ordersList.size() > 0){
            for (Orders orders : ordersList) {
                orders.setStatus(Orders.CANCELLED);
                orders.setCancelReason("订单超时,自动取消");
                orders.setCancelTime(LocalDateTime.now());
                orderMapper.update(orders);
            }
        }
    }

    @Scheduled(cron = "0 * * * * ?")
    public void processComplete(){
        //1.查询过夜仍未确认订单:根据订单状态和下单时间查询
        log.info("处理超时订单:{}",new Date());
        LocalDateTime time = LocalDateTime.now().plusMinutes(-60); //1小时自动确认
        List<Orders> ordersList = orderMapper.getByStatusAndOrderTimeLT(Orders.DELIVERY_IN_PROGRESS,time);
        if(ordersList != null && ordersList.size() > 0){
            for (Orders orders : ordersList) {
                orders.setStatus(Orders.COMPLETED);
                orderMapper.update(orders);
            }
        }
    }
}
Echart
百度开源的图片数据展示框架。
日期与销量展示:
控制层:这里前端提供开始、结束时间(后端转换日期格式),返回两个序列化后的列表(时间、销量)
@GetMapping("/turnoverStatistics")
    public Result<TurnoverReportVO> turnoverReport(
            @DateTimeFormat(pattern = "yyyy-MM-dd") LocalDate begin,
            @DateTimeFormat(pattern = "yyyy-MM-dd") LocalDate end) {
        log.info("查询营业额数据:{}到{}", begin, end);
        TurnoverReportVO data = reportService.getTurnoverStatistics(begin, end);
        return Result.success(data);
    }
业务层:分别处理日期、数据查询;最后序列化列表,封装数据返回
 @Override
    public TurnoverReportVO getTurnoverStatistics(LocalDate begin, LocalDate end) {
        //1.创建日期列表
        List<LocalDate> dateList = new ArrayList<>();

        dateList.add(begin);
        while (!begin.equals(end)) {
            begin = begin.plusDays(1);
            dateList.add(begin);
        }
        //2.创建营业额列表
        List<Double> turnoverList = new ArrayList<>();
        for (LocalDate date : dateList) {
            //每天分别查询并计算
            //创建完整的一天的开始和结束时间段:
            //LocalTime.MIN 代表一天的开始时间,即 00:00:00(午夜)
            //LocalTime.MAX 代表一天的结束时间,即 23:59:59.999999999(几乎是一天的最后一纳秒
            LocalDateTime beginTime = LocalDateTime.of(date, LocalTime.MIN);
            LocalDateTime endTime = LocalDateTime.of(date, LocalTime.MAX);
            //封装起来查询用
            Map map = new HashMap();
            map.put("begin", beginTime);
            map.put("end", endTime);
            map.put("status", Orders.COMPLETED);
            Double turnover = orderMapper.sumByMap(map);
            turnover = turnover == null ? 0.0 : turnover;
            turnoverList.add(turnover);
        }
        return TurnoverReportVO.builder()
                .dateList(StringUtils.join(dateList, ","))
                //[2023-10-01, 2023-10-02, 2023-10-03, 2023-10-04] 转换为"2023-10-01,2023-10-02,2023-10-03,2023-10-04"
                .turnoverList(StringUtils.join(turnoverList, ","))
                .build();
    }
Top10菜品展示
业务层:流处理很好用,值得学习
 public SalesTop10ReportVO getSalesTop10(LocalDate begin, LocalDate end) {
        LocalDateTime beginTime = LocalDateTime.of(begin, LocalTime.MIN);
        LocalDateTime endTime = LocalDateTime.of(end, LocalTime.MAX);
        List<GoodsSalesDTO> goodsSalesDTOList = orderMapper.getSalesTop10(beginTime, endTime);
        return SalesTop10ReportVO.builder()
                // 将List<GoodsSalesDTO>转换为List<String> by GoodsSalesDTO::getName 流方式
                .nameList(goodsSalesDTOList.stream().map(GoodsSalesDTO::getName).collect(Collectors.joining(",")))
                .numberList(goodsSalesDTOList.stream().map(GoodsSalesDTO::getNumber).map(Object::toString).collect(Collectors.joining(",")))
                .build();
    }